El detrás de cámaras de nuestro video de la página de inicio
Publicado por Jeremy Wick el
Nuestra página de inicio es la primera interacción que la mayoría de los visitantes y clientes tienen con nuestra marca. Nuestro anterior video de la página principal mostraba el proceso de pedido, pero carecía de una historia que se centrara en nuestros clientes. A continuación presentamos un vistazo entre bastidores de cómo creamos nuestro nuevo video de página de inicio.
Guión
En lugar de hacer un video básico de "cómo se hace", queríamos hacer algo que fuera más inspirador y persuasivo. Para ello, sabíamos que teníamos que contar una historia, una que girara en torno a nuestros clientes. Una bendición y una maldición de nuestro negocio es que tenemos todo tipo de clientes diferentes: grandes empresas, pequeñas empresas, organizaciones sin ánimo de lucro, aficionados, aficionados al bricolaje, desarrolladores, diseñadores... la lista continúa. No hay un solo "cliente objetivo" que perseguimos, así que decidimos centrar nuestra historia en tres: una startup, un bricolador y un diseñador.
Una vez seleccionados nuestros personajes, nos centramos en algunas características clave de Sticker Mule que queríamos destacar en el guión:
Facilidad de uso
- No hay restricciones de archivo
- Amigable para el móvil
Pruebas
- Pruebas online en 4 horas
- Revisiones ilimitadas
Velocidad
- Rápida respuesta
- Envío gratuito
Era importante destacar las pequeñas diferencias en la forma en que cada persona utilizaba Sticker Mule. Por ejemplo, si sólo mostramos a alguien subiendo una foto desde su teléfono, eso puede hacer que el diseñador no quiera una impresión perfecta de un píxel. Pero si sólo mostramos al diseñador subiendo una imagen vectorial, eso podría hacer que alguien que no tiene habilidades de diseño gráfico se alejara.
Después de mostrar todo el proceso de pedido, nos centramos en cómo cada persona utilizó sus pegatinas en la vida real. La facilidad de pedido y la rapidez de envío son excelentes, pero la forma en que planean utilizar las pegatinas es la principal razón por la que la gente compra en primer lugar.
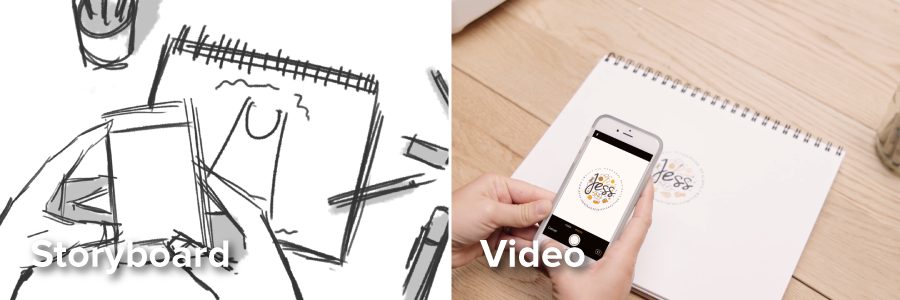
Guión Gráfico
Un guión gráfico es un dibujo escena por escena de cómo se verá el video. Creamos un storyboard para planificar la filmación y arreglar cualquier dificultad potencial antes de filmar nada. Mantuvimos las cosas simples limitando el video a 4 lugares diferentes: La oficina de Aaron, el espacio de trabajo de Jess, el escritorio de Brian, y un lugar que se relacione con los tres.
Voz en off
Utilizamos la misma voz en off profesional para mantener la coherencia con nuestros otros vídeos. Una gran ventaja de usar una voz en off (en contraposición a los diálogos en cámara), es que no tuvimos que preocuparnos por el sonido una vez que empezamos a filmar. Esto hizo que el rodaje y la edición fueran mucho más fáciles y rápidos.
Rodaje
Grabamos todo el video en un día. Esto requirió un calendario apretado para cada lugar y establecer tiempos de llamada para los actores. Afortunadamente, cada lugar estaba relativamente cerca y todos llegaron a tiempo.
Mantuvimos el guión gráfico a mano como referencia para asegurarnos de que cada toma se ajustaba a lo que habíamos previsto.
Para la escena final, sabíamos que el momento era clave. Así que pusimos la voz en off a través de un iPhone, que mantuvo el movimiento de la cámara y los actores sincronizados. ## Editando Utilizamos una combinación de Premiere Pro y After Effects para todo el trabajo de postproducción de este vídeo.
Dado que el proceso de pedido es una parte clave de este vídeo, sabíamos que todo lo que tuviera lugar en las pantallas del vídeo tenía que verse realmente bien. Pero rodar una pantalla no siempre es fácil y no siempre se ve tan nítido como uno desearía. Por eso decidimos superponer los screencasts sobre las pantallas grabadas en el vídeo. En el caso del MacBook y el iMac, esto fue relativamente fácil, pero en el caso del iPhone, el seguimiento de los movimientos y el enmascaramiento fueron necesarios para que el vídeo se viera realista.
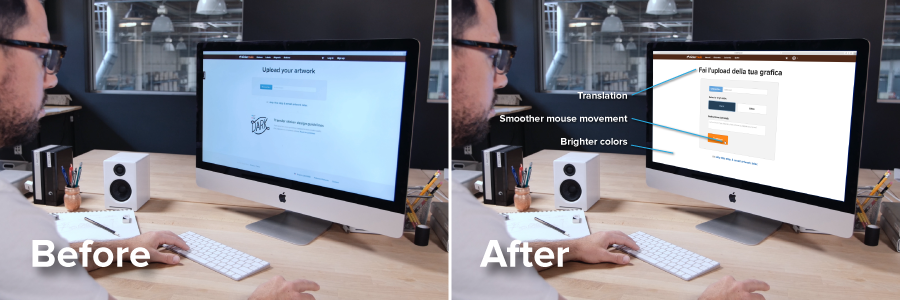
En lugar de utilizar material de captura de pantalla directamente, recreamos cada escena y la animamos en After Effects. Esto hizo que todo el movimiento fuera perfectamente fluido y nos ayudó en el siguiente paso: la traducción.
Traduciendo
Como todo el video fue narrado a través de una voz en off, esto hizo que la traducción fuera muy sencilla. Sin embargo, las escenas en pantalla necesitaban ser actualizadas para tener las versiones localizadas del sitio en cada idioma. Para facilitar esta tarea, utilizamos el plugin Templater Rig After Effects de Dataclay.
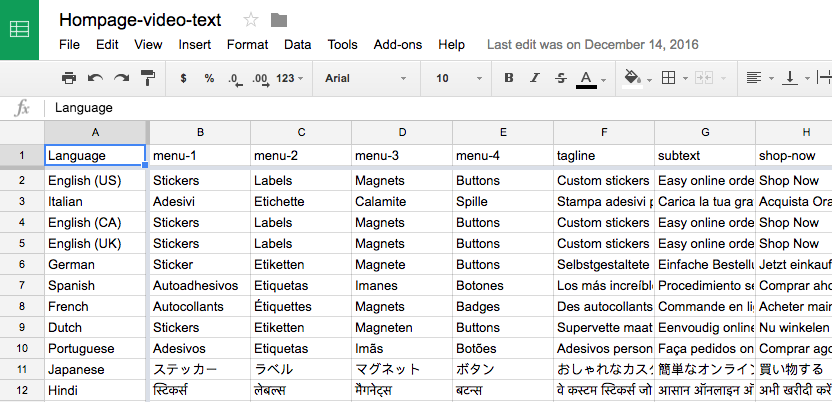
El plugin Templater nos permitió actualizar cada capa de texto a través de una hoja de Google. Sólo tuvimos que animar los screencasts una vez, y pudimos cambiar de idioma fácilmente con un clic de un botón.
Si estás interesado en ver el vídeo de nuestra página web en diferentes idiomas, aquí están los enlaces. ¡Asegúrate de volver a cambiar al inglés (abajo a la derecha) cuando hayas terminado!
Conclusión.
Estamos agradecidos de tener 100.000 clientes que confían en nosotros para imprimir sus pegatinas personalizadas, imanes y sobres personalizados. Es imposible capturar la historia única de cada uno, sin embargo, nuestro objetivo fue capturar una representación de muchas historias en un minuto y quince segundos.
Y si te gustó este video, deberías suscribirte a nuestro canal en YouTube.
Comentarios