Ready to print checklist with sticker sizes for printing
Posted by Sticker Mule on
If you’re a designer, chances are you spend a lot of time in the digital realm. And while you might be the best pixel pusher around, the rules change when it comes to print design. Here’s a checklist of everything you need to do to make sure your design is perfectly print-ready.
Dimensions: At least 300 PPI
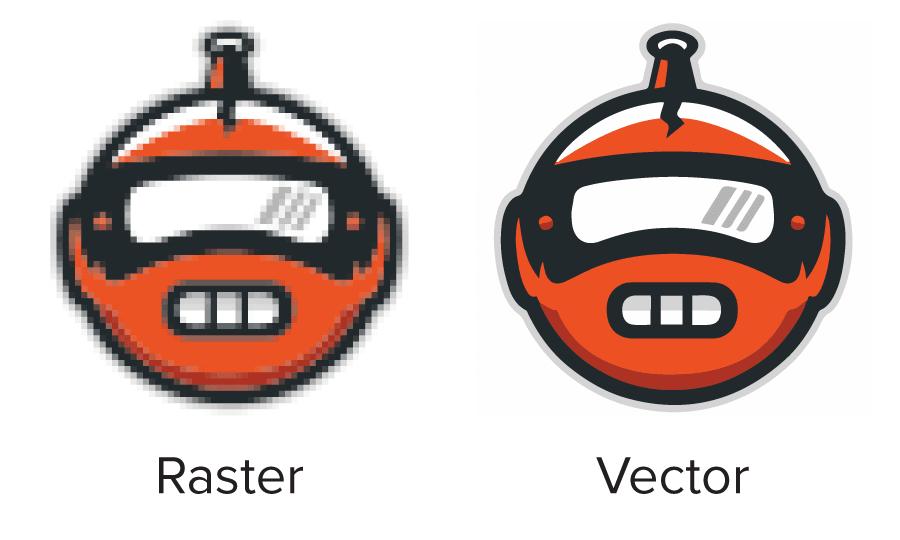
If you’re working with vector artwork, you can go ahead and check this off. If you’re working with raster artwork, you’ll want to make sure it is at least 300 PPI (pixels per inch). You can increase the resolution of any artwork file automatically with Upscale.
If you plan on using a logo, text, or illustration for print, we recommend tracking down a vector (or high resolution) version of the artwork if possible. If you need help, we recommend checking out our vectorization service: Redraw.
To measure your artwork’s PPI, divide the width of your artwork’s dimensions by the width of your desired print size. For example, if your artwork was 600 pixels wide and you planned to have it printed 3 inches wide, you’d only have 200 PPI. This would result in a low quality print and may cause your artwork to look pixelated. In this case, it would be best to either recreate your design at a higher resolution or go for a smaller print.
To figure out the maximum size your artwork should be printed at, divide the dimensions of your artwork by 300. For example, if your artwork was 600 x 450 pixels, the maximum size would be 2" x 1.5".
(Note: DPI or Dots Per Inch refers to the resolution settings of the printer, while PPI refers to the resolution of the artwork. Occasionally these two terms get mixed up.)
For example, if you want to print stickers, the following dimensions are some popular sizes and resolutions that should be good for stickers;
- 2" x 1" (Min = 600 x 300 pixels) (Good = 1200 x 600 pixels)
- 2" x 2" (Min = 600 x 600 pixels) (Good = 1200 x 1200 pixels)
- 4" x 2" (Min = 1200 x 600 pixels) (Good = 2400 x 1200 pixels)
- 4" x 4" (Min = 1200 x 1200 pixels) (Good = 2400 x 2400 pixels)
Color Mode: CMYK
Digital screens use a combination of red, green, and blue light (RGB) to form different colors, while printers use a combination of cyan, magenta, yellow, and black ink (CMYK) to form different colors.

You can convert your colors from RGB to CMYK (or vice versa) in most applications by simply changing the color mode. Most online design tools like Studio or Canva, you can skip this since they convert all orders to CMYK files.
However, while RGB can display a very wide color gamut for screen viewing, the same bright, vibrant colors may not be achieved in the more limited CMYK color space available for printing.
When designing something for print only, it is best to start in CMYK color mode, or at least be aware that some RGB colors might look different when printed.
Units: Inches
Designing with inches (instead of pixels) will help you in a few ways. First, it’ll help you figure out the exact dimensions of your print without having to do any math. But more importantly, it will help you indicate any cut lines or bleeds in a way that is compliant with most print shops’ requirements.
For example, Sticker Mule’s transfer stickers require that any solid parts of your design be at least 0.07" thick. Working with inches makes this possible to measure.
Cut lines
Cut lines tell the print shop where to cut your print.
Some print products, such as die cut stickers, can be cut into any shape. At Sticker Mule we will automatically figure out your cut lines for you if none are indicated. By default, this is usually a uniform offset of the shape of your artwork.
Indicating your own cut lines will give you full control over how your print is cut and can often speed up the proofing process. Cut lines should be indicated with a 1pt stroke.
Bleeds
A bleed is anything being printed that extends beyond the cut lines. Bleeds are necessary whenever you want something to extend beyond the trim edge, leaving no white margin.
At Sticker Mule, this is another thing we will add for you automatically as needed if possible. However, if you have something that is especially complex that you would like to be printed “full bleed” (to the edge of the print), then you will need to make sure it extends at least 1/16" past the cut lines.
Outline text
This is a pretty basic rule when it comes to design, but it is often overlooked. Since there’s no way to ensure that a print shop will have all the fonts you use in your design, it’s best to make sure any text used is converted to outlines.
In Adobe Illustrator you can do this by selecting the text then selecting Type > Create Outlines.
With these items complete, your file should be perfectly print-ready. It’s usually best to save the file in its native format (Illustrator, Photoshop, Sketch), in case you need to revisit it later. Most print shops (including Sticker Mule) will accept artwork in their native formats.
As mentioned before, certain colors will often look different between digital and print – there’s no way around this.
Once you've perfected the print file, why don't you try printing some stickers in different shapes and sizes today at Sticker Mule!
Comments