Como adicionar uma margem perfeita ao seu design no Adobe Illustrator
Publicado por Miles Wright em
Se alguma vez tentou ampliar certas formas usando a ferramenta Escala do Adobe Illustrator, provavelmente reparou numa coisa frustrante: as margens nem sempre se alinham corretamente. Em vez de manter margens uniformes, algumas áreas acabam por ficar maiores do que outras, tornando o seu design inconsistente e desorganizado.
Isto torna-se um problema real quando está a desenhar autocolantes, onde as margens precisam de ser precisas, especialmente para impressão de autocolantes stickers, em que o padrão da indústria exige uma sangria de 3 mm.
Felizmente, a ferramenta Deslocar Caminhos (Offset Path) do Illustrator facilita a criação de margens perfeitas em píxeis, mantendo as formas intactas. Por isso, já não precisa de desenhar uma linha em redor do seu design com a ferramenta Caneta nem de tentar outros métodos complexos e demorados.
Vamos explicar passo a passo.

O que é a ferramenta Deslocar Caminhos e porque deve utilizá-la?
Deslocar Caminhos permite criar um duplicado de uma forma a uma distância fixa, expandindo-a ou contraindo-a, mantendo todas as proporções intactas. Isto é particularmente útil para:
Criar linhas de corte precisas para autocolantes e materiais de impressão A maioria das impressoras exige uma margem de 3 mm para autocolantes cortados em matriz e autocolantes meio-corte. Deslocar Caminhos simplifica a criação de linhas de corte consistentes e prontas para impressão sem ajustes manuais.
Criar margens uniformes em torno de formas complexas Perfeito para estrelas, ícones, logótipos e formas irregulares que não redimensionam uniformemente com a ferramenta de Escala padrão. Essencial para manter espaçamentos precisos.
Criar contornos e bordas de texto escaláveis Permite criar contornos de texto mais espessos que não se distorcem nem esticam como o efeito Traçado. Ideal para tipografia em negrito, emblemas e designs de autocolantes de estilo retro.
Como usar a ferramenta Deslocar Caminhos no Illustrator para autocolantes
Vamos percorrer os passos para criar margens perfeitas para autocolantes, usando uma forma de estrela como exemplo.

Passo 1: Selecionar a forma
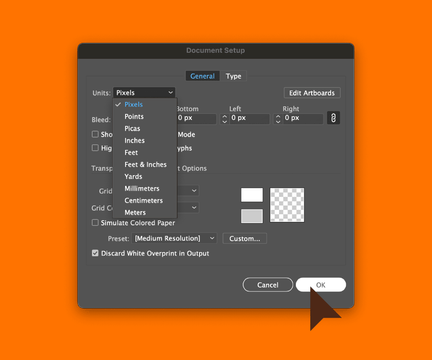
Como o objetivo é adicionar uma margem de sangria exata de 3 mm, é importante que o design já esteja no tamanho final. Deve certificar-se de que está tudo correto antes de continuar. Se o documento ainda estiver definido em píxeis, altere rapidamente. Vá a Ficheiro > Configuração do Documento. Em Unidades, altere para mm. Clique em OK.
Agora, selecione a forma. Se o design já tiver várias camadas, selecione a camada mais exterior.
Outra forma é selecionar todo o design e ir a Objeto > Expandir para achatar tudo e usar Janela > Criador de Formas (Pathfinder) > Unir para transformar tudo num único objeto.
Passo 2: Aplicar a ferramenta Deslocar Caminhos
Vá a Objeto > Caminho > Deslocar Caminhos. Na janela que surge, defina o valor do Deslocamento para 3 mm(margem de sangria mínima para autocolantes).
Se achar que o seu design precisa de uma margem maior, sinta-se à vontade para aumentá-la, desde que mantenha, no mínimo, os 3 mm. Pessoalmente, há quem prefira margens um pouco mais espessas.

Quando se utiliza o Deslocar Caminhos com este objetivo, definir as Junções como Arredondadas costuma ser a melhor opção, para evitar arestas irregulares. Clique em OK para aplicar as alterações.
Passo 3: Fazer ajustes
Se necessário, ajuste a espessura ou a cor da margem para que se destaque mais. Como referido anteriormente, não precisa de ser exatamente 3 mm, se quiser aumentá-la um pouco. Também não precisa de ser branca.
Pode até aplicar dois deslocamentos diferentes para criar um efeito de camadas. Sinta-se à vontade para experimentar e explorar diferentes combinações.

Passo 4: Finalizar o design do autocolante
Quando estiver completamente satisfeito com o seu design, prepare-o para impressão e/ou utilização digital. Se o for imprimir, vale a pena dar um passo extra e incluir uma linha de corte, para que a gráfica saiba exatamente onde o autocolante deve ser cortado. Assim, também saberá o que esperar. Para isso, copie a forma original (⌘+C no Mac, Ctrl+C no Windows). Vá a Janela > Camadas e adicione uma nova camada através do botão Criar Nova Camada.
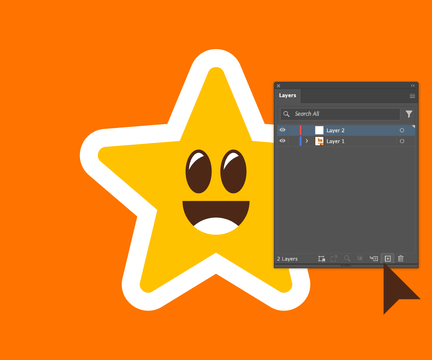
Atribua o nome da camada para "Linha de Corte" e cole a forma nessa camada usando a opção Colar à Frente (⌘+F no Mac, Ctrl+F no Windows).
Atribua-lhe um contorno de cor diferente e dê o mesmo nome à amostra de cor: "Linha de Corte".
E já está!

E, para comparação, eis o que teria acontecido se tivesse utilizado a ferramenta Escala em vez da ferramenta Deslocar Caminhos:
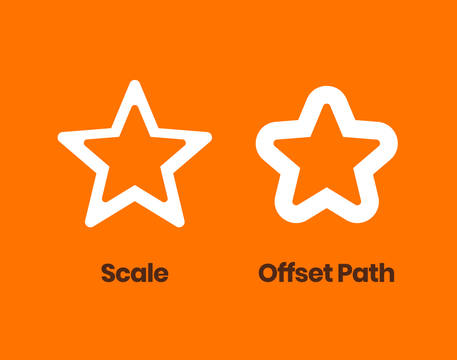
Que diferença, não acha? É por isso que recomendo sempre usar a ferramenta Deslocar Caminhos para esta finalidade — é, aliás, de longe a aplicação mais comum desta ferramenta no Adobe Illustrator.
Em tutoriais futuros, abordaremos outros usos, mas por agora, divirta-se a pôr este método em prática!
E, depois de aperfeiçoar o seu design, o passo seguinte é, naturalmente, dar-lhe vida. Quer esteja a imprimir autocolantes cortados em matriz para um visual arrojado e personalizado, ou a optar por autocolantes meio-corte para criar folhas fáceis de descolar, ter margens e linhas de corte precisas faz toda a diferença.
Com a configuração certa, os seus autocolantes serão impressos na perfeição e destacar-se-ão em qualquer contexto.
Experimente e conte-nos como correu com os seus designs!
Comentários